
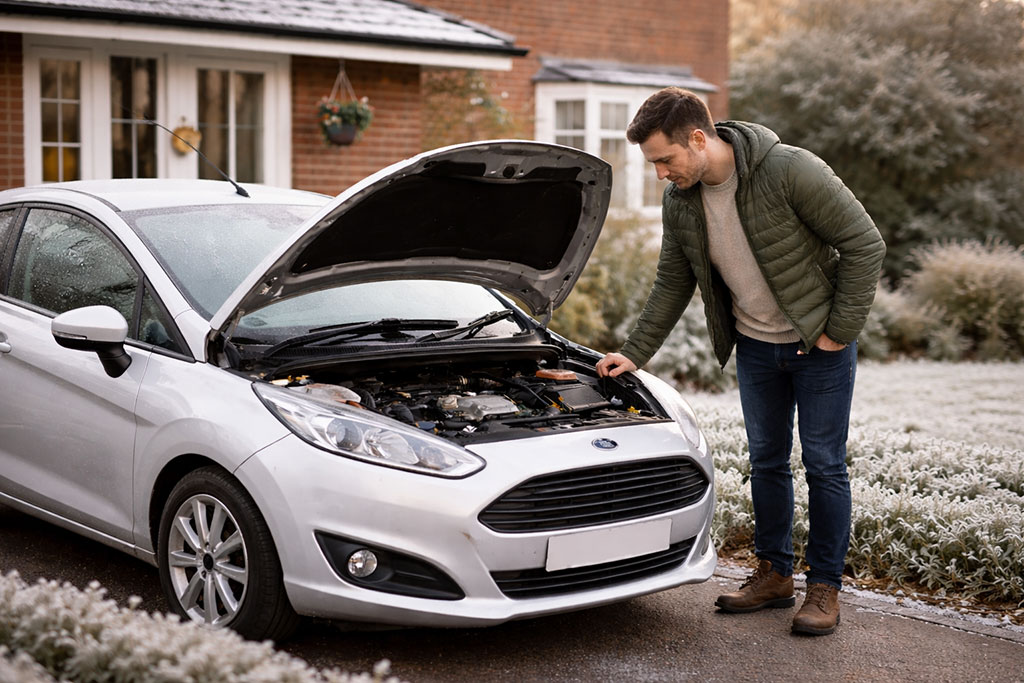
This isn’t a mechanical inspection. You don’t need tools, ramps, or car knowledge.
This is a five-minute check to make sure your car is safe, legal, and not about to surprise you.
Step 1 (1 minute): Am I legal – and not about to be caught out?
Start with the three dates that can cause the biggest headaches if they’re missed:
- MOT
- Vehicle tax
- Insurance
You’re not doing anything clever here – just checking the expiry dates and making sure none are closer than you realised.
January is a common time for surprises because:
- MOTs get booked months in advance, then forgotten
- Tax reminders are easy to miss
- Insurance renewals often sit quietly until the last minute
A quick insurance nudge
Insurance is the one thing we can’t check for you automatically – that’s not allowed. So it’s worth making sure the renewal date in your KnowYourCar app is correct. That way, we can nudge you at the right time.
Why that matters:
Most insurers price more competitively when you shop around 20–23 days before renewal. Leave it too late, and prices tend to rise.
Step 2: Tyres – including the legal tread markers you should know about
Tyres are the one part of the car that actually touches the road, and they’re also one of the easiest things to check properly once you know what to look for. You don’t need tools or measurements – just your eyes.
What to check first (30 seconds)
Stand a few metres back and look at all four tyres.
You’re checking:
- does any tyre look visibly flatter than the others?
- does anything look obviously damaged or uneven?
If one tyre looks noticeably lower, that’s worth dealing with soon. To add air to a tyre, follow our handy article: Using a Tyre Air Pump at Petrol Stations: A Step-by-Step Guide
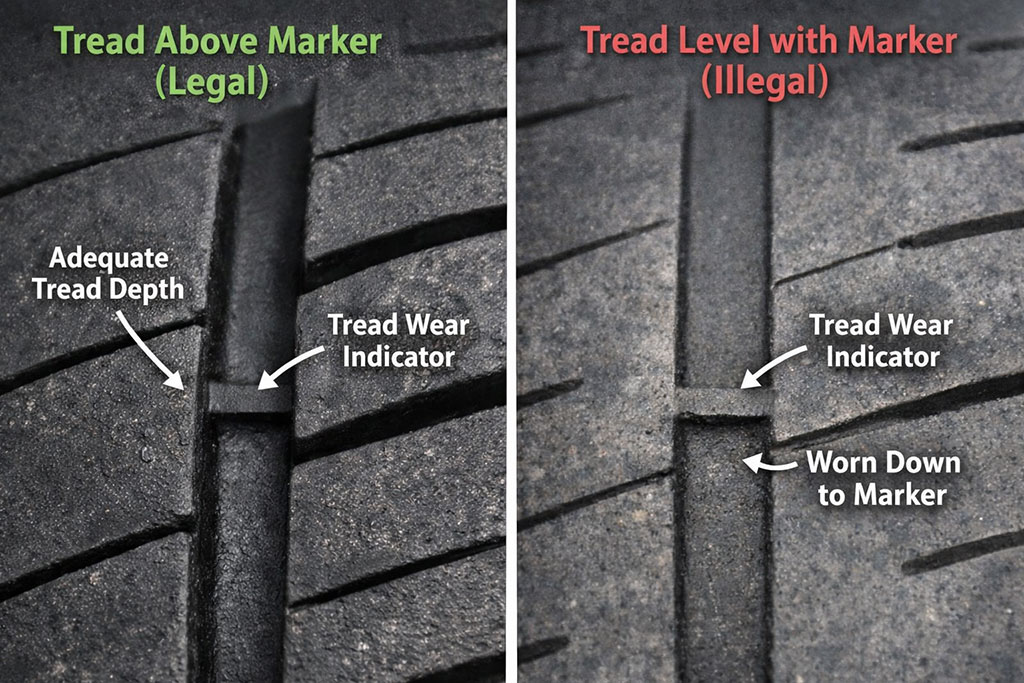
The important bit many drivers don’t know: tread depth markers
Every modern tyre has built-in legal tread depth markers.
These are:
- small raised bars of rubber
- running across the grooves of the tyre
- spaced around the tyre at several points
They are deliberately designed to show you when a tyre is worn out.
What they mean
- In the UK, the legal minimum tread depth is 1.6 mm
- The raised bars represent that limit
If the surface of the tyre is:
- above the bars → the tyre is still legal
- level with the bars → the tyre is illegal
- below the bars → the tyre is unsafe and illegal
You don’t need a gauge — the tyre is literally telling you.
Why this matters
Driving on tyres that are at or below the legal limit can:
- significantly reduce grip, especially in wet conditions
- increase stopping distances
- result in:
- a fine
- points on your licence
- issues with insurance if you’re involved in an accident
Many drivers are caught out simply because they didn’t know where to look.
How to check properly (1 minute total)
- Turn the steering slightly so you can see the front tyres clearly
- Look into the main grooves of the tyre
- Find the raised bars
- Check a few different places around the tyre
If the tread is level with the bars anywhere on the tyre, it’s time to replace it.
Tyre pressure warning lights (quick reminder)
If your dashboard shows a tyre pressure warning:
- it usually means pressure has dropped
- it does not automatically mean the tyre is illegal or punctured
Cold weather can trigger this. It’s still worth checking pressures soon.
One final reminder
Tyres rarely fail suddenly. They wear down gradually – which is why these markers exist. A quick glance once in a while is usually all it takes to stay safe, legal, and in control.
Step 3 (1 minute): Warning lights – which ones matter now
Turn the ignition on and note any warning lights that stay lit.
The key here is separation, not panic.
- Red warning lights (oil pressure, brakes, charging) usually mean don’t ignore this
- Amber lights often mean needs attention, but not necessarily today
- A light that’s been on for weeks with no symptoms is different from a new one
The goal isn’t to diagnose anything — it’s to avoid ambiguity.
Not all warning lights mean danger. But some mean “don’t put this off”.
Step 4 (1 minute): Fluids you can check yourself
Two simple checks:
- Oil level (dipstick or digital display)
- Screen wash (especially important in winter)
Oil checking sounds technical, but it’s one of the simplest checks you can do.
Before you start (important)
- Park on level ground
- Make sure the engine is off
- Ideally wait 5–10 minutes if the car has been driven recently
You’re giving the oil time to settle.
Method 1: Dipstick (most common)
- Open the bonnet
- Find the dipstick (usually a bright yellow or orange handle). Consult your owners manual for the location if it’s hard to find.
- Pull it out
- Wipe it clean with a tissue or cloth
- Push it fully back in
- Pull it out again and look at the oil level
On the dipstick you’ll see:
- two marks, holes, or lines
- one marked MIN
- one marked MAX
What you’re looking for
- The oil level should be between MIN and MAX
- Anywhere in that range is fine
- Near MIN = top up soon
- Below MIN = don’t ignore
You are not aiming for perfection.

You’re not fixing anything here. You’re just confirming nothing is quietly drifting out of range.
Method 2: Digital oil level (some newer cars)
Some cars don’t have a dipstick.
Instead:
- use the car’s screen or dashboard menu
- follow prompts like “Vehicle status” → “Oil level”
- wait for the reading (this can take a minute)
You’re simply checking whether it says:
- OK
- Low
- Add oil
No guesswork required.
If you need to add oil: how to do it safely
Finding that your oil level is low can feel intimidating – especially if you’ve never topped up oil before. The good news is that oil top-ups are routine, safe, and simple. You’re not servicing the car. You’re just bringing the oil back into its normal range.
Step 1: Make sure you use the right oil
Cars don’t all use the same oil.
Before adding anything:
- Use KnowYourCar to check exactly which oil specification your car requires
- This matters more than the brand – it’s the type and grade that count
Once you know the correct oil, buy a small container (usually 1 litre). That’s perfect for a top-up.
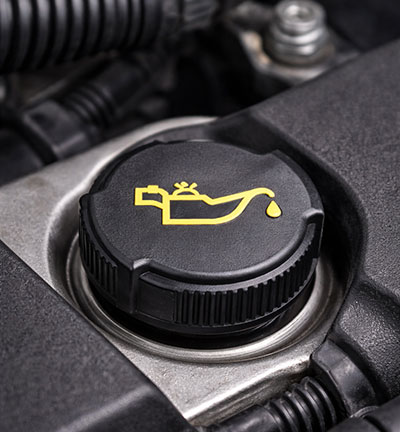
Step 2: Find the oil filler cap
Open the bonnet and look for the oil filler cap.
It:
- is usually on top of the engine
- almost always has an oil can symbol on it
- is typically black or yellow
- twists off by hand
It will not be the dipstick – the dipstick pulls out, the filler cap unscrews.
Step 3: Add a small amount – less than you think
This is the most important rule:
Never pour in the whole bottle.
Instead:
- add a small amount first (around 250–500 ml, roughly half a litre at most)
- pour slowly
- don’t rush
Tip: Oil bottles often glug when you pour. Keep some kitchen paper around the filler opening so any small spills are caught. A little spillage is normal – don’t worry about it, you’re just trying to keep mess away from other bits of the engine.
Step 4: Re-check the level
After adding oil:
- Wait a minute
- Re-check the oil level using:
- the dipstick, or
- the car’s digital oil level check
You’re aiming for:
- the oil level sitting between MIN and MAX
- it does not need to be right at MAX
Anywhere in the safe range is absolutely fine. If it’s still low, repeat with a small additional amount and re-check again.
Step 5: Close everything and you’re done
Once the oil level is back in range:
- refit the oil filler cap securely
- close the bonnet properly
That’s it. No reset buttons. No tools. No garage visit required.
A final bit of reassurance
Topping up oil:
- does not void warranties
- does not mean something is wrong
- most engines naturally use some oil over time. Keeping it topped up is simply part of normal ownership.
Screen wash is even easier. They will be a small cap which looks similar to the image below (it’ll often have a windscreen/wiper image on it:
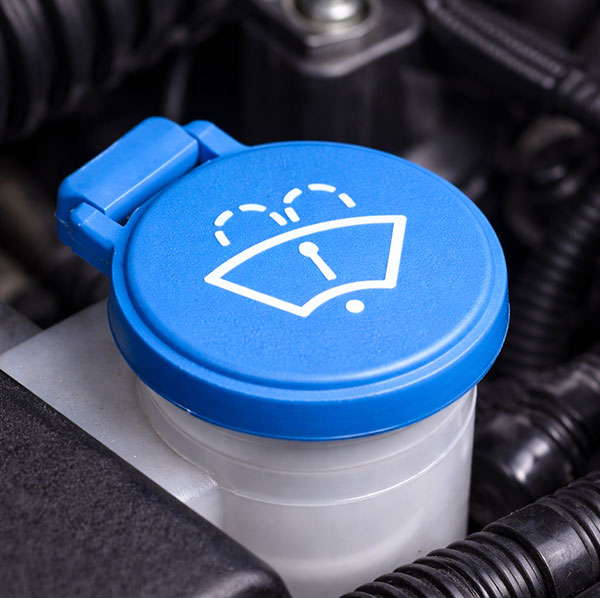
There’s no special rules on how to fill this up. Just buy some screen wash at your local super store or car parts dealer and pour directly into this. Do it until it reaches the top. Don’t worry if it spills over, just try not to get it everywhere. In emergencies you can just top up with water. But ideally you always want to use proper screen wash. Pure tap water will eventually gunk up the system with limescale, so avoid it.
A note of caution
If you are not sure which filler cap is which, DO NOT guess the oil cap or the screen wash. They are usually clearly marked, but if they are not do not guess which is which. Consult your owners manual and if still unsure STOP.
Step 5 (1 minute): Battery and starting behaviour
Most drivers don’t know what a battery problem feels like until it fails.
Here’s what to notice:
Signs of a weakening battery
- engine cranks more slowly than usual
- dashboard lights dim or flicker when starting
- the car hesitates before starting, especially in cold weather
What this does not mean
- it does not mean the car is about to die
- it does not mean you need urgent repairs today
It means the battery is losing strength. If it needs replacing, use KnowYourCar to tell you which battery is right for your car. If you fancy a small challenge, then change it yourself, alternatively shops like Halfords will fit it for you.
Final sense check: How does the car feel?
This is the most underrated step.
Ask yourself:
- Does it feel broadly normal?
- Any new noises?
- Any pulling, vibration, or odd smells?
You don’t need to name the issue. Drivers often notice change long before warning systems do. You’re allowed to trust that instinct.
If one thing feels slightly off
Make a note and don’t panic. Small issues are usually cheaper when addressed early on. Just explain the issue to your local mechanic and ask for ideas of what they think it could be. They’ll often ask for the vehicle to be brought in so they can road test and do some diagnosis.
Why this works
Most cars don’t fail suddenly.
They whisper first – through dates, lights, feel, and small changes. These checks just help you notice those signals without turning car ownership into a chore.
Five minutes now is usually cheaper than a surprise later.


One thought on “The 5-minute “Am I OK?” car health check (January edition)”
Leave a Reply
You must be logged in to post a comment.
Thank you for telling us about my car, and also showing pictures of how to reset things i did not know about. You are the BEST app.